


Know what I love? Cardboard!!!! Because it is supreme!
Cardboard is cheap (or free!), readily available, recyclable, and generally easy to work with.
Oh!
And the possibilities!!
Here are some of my favorite tips and tools for working with glorious cardboard.

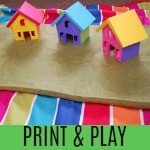
1. Stuff ‘Em — In the case of the city blocks I made (shown above), to help make the boxes more sturdy I stuffed them with newspaper. Simple, and effective!
2. Paint — If I’m painting brown cardboard to make it white (as I did in the project above), I like to use Golden Acrylic Gesso (a canvas primer) applied with a gesso brush like this one
. It covers well, dries quickly, and doesn’t flake off.

3. Reinforcement Tape — My hubby gifted me with several rolls of this gummed reinforcement tape for Christmas. Isn’t he the best?? I love how it gives any cardboard project a clean, polished look and made this cardboard cafe super sturdy to withstand plenty of pretend play fun! This tape has water-activated adhesive, so once it is wet with a sponge it sticks very well to cardboard. Because it is kraft paper it can be painted over too!
4. Inside Out — Sometimes cardboard boxes get a little banged up or they have lots of lettering printed on the outside. To clean them up a bit, I just take them apart and turn them inside out. If taped properly, they will be sturdier too.
5. Heavy Duty Box Cutter — To cut through corrugated cardboard, a heavy duty box cutter is a great tool. Keep it far away from the kiddos, of course.

6. Building with the Kiddos — For a fun cardboard building experience with kiddos age 5 and up, give Makedo kits a try! Emily used a Makedo kit to make this cardboard airplane from an empty diaper box (shown above), and we have used it many times for other cardboard crafting fun!

Makedo kits include cardboard safe-saws, reusable hinges, and connectors that allow kids to create amazing toys and play spaces.

6. Decorating — To add a bit of color to plain brown cardboard, the kids use stickers, markers, or glue on pieces of colored tissue paper.

Another decorating favorite is bulletin board trim (shown at the top of the flower shop below).

7. Use (and Re-use) What You Have On-Hand — We have used and re-used the same package of bulletin board trim for many projects. Use masking tape to hold the trim in place, and it can be removed to use again later!

So what are you waiting for? Go build something amazing with cardboard!!!
Have fun!
You can read more about my obsession with cardboard, things that inspire me, and tips for fostering creativity on a budget at this interview I did with the lovely Jean from The Artful Parent. ((Thank you, Jean!!)) While you’re there, be sure to enter to win a fun giveaway!


I have been sooo wanting to make me a little kitchen for my classroom. This is such a big help!!
Dear Valerie,
Do you need more gummed reinforced tape yet? I thought that ~ 1/4 mile of the stuff would be enough, but maybe I was wrong.
Love,
Mark
I think you’re brilliant. Do you allow people to share your photos and connect back to your site? I would love to post about your blog!! Amazing! Great work!!
Wow!! that cardboard kitchen is brilliant. And the aeroplane – the little girl looks like she is having such fun! Hope you don’t mind if I share a link on my Facebook page.
Right now we’re just using our cardboard for stacking the boxes and knocking them down. The kids love that.
I am always amazed with how you can transform recycled items into works of arts. Thanks for sharing your tips!
Oh! I’m going to have to look into those Make Do Kits. Thanks to my recent cardboard project, a couple of weeks ago, my thumb has not had feeling in it since. The pressure I put on the nerve when I used the scissors to cut through the cardboard has ruined it. I’m really afraid I may have permanently damaged it! That little saw would probably be the best option for me from now on!
A regular old Stanley (or generic) box cutter does amazing things. Tips from my days in shipping:
– Score with the back of the knife (blade in, turn it over and push where the blade would come out) before folding, either across the grain or with it. Score on the inside of the fold.
– To cut at the corner of the box, cut up and from the inside. Poke the blade out at the corner and just pull up. No overcuts, and it stays right in the corner.
– A fresh blade makes all the difference. Buy a 100-pack and hang it out of reach of the kids.
Wow! I am brand new to the Frugal Family Fun Blog and am already planning to try your airplane project. We are new to homeschooling and I may be drowning in it. Sites like yours are my lifeboat 🙂 Thank you!
Wow, I’d never thought of using it in so many ways. Make me rethink playtime. 😎
Veronica @ http://watchmeplaynlearn.blogspot.com/